A practical introduction to code splitting in React
Published
Table of content
- What is code splitting?
- Setting up the demo app
- Implementing code-splitting at the route level
- Fixing the multiple loaders
- Beyond code splitting at the route level
- Conclusion
- Resources
In this blog post, we'll explore various techniques for code splitting in React applications. We'll cover methods like lazy loading components, dynamic imports, and route-based code splitting. Throughout the article, we'll use a demo app to illustrate each technique so you can follow along and implement these concepts in your React projects. If you’d like to code along, feel free to clone the Github repository.
Before exploring the different techniques, let’s first understand code splitting and how it can improve the user experience.
What is code splitting?
At its core, code splitting is a technique for dividing your code into different chunks or pieces. A chunk is a separate file that your bundler (or build tool) loads at specific moments — for example, a JavaScript file that loads when your user navigates to the About page.
Code splitting works alongside your build tool. Build tools like Vite bundle and optimize your CSS, JavaScript, images, and other assets for production. The build tool determines which code should load initially (when the app first starts) and which can be loaded on demand (as the user interacts with the app). While the techniques for code splitting can vary depending on the build tool, the underlying concept remains the same.
Setting up the demo app
To follow along with this post, clone the repository from GitHub and check out the start-route-code-splitting branch:
git clone https://github.com/liv7c/demo-code-splitting-react-vite
cd demo-code-splitting-react-vite
npm install
git checkout start-route-code-splitting
npm run dev
The start-route-code-splitting branch contains the initial setup, but no code-splitting techniques have been applied yet.
App overview
After running the app, you should see the following pages:
- Home Page: The main landing page of the app.
- Movies Page: Displays a list of movies fetched from a free API.
- Movie Detail Page: Shows detailed information about a specific movie.
- About Page: Includes an informational modal for additional details.
Technical stack
- The app was created with Vite using the
npm create vite@latestcommand. - React Query is used for data fetching, and Radix UI is used for the modal component.
- The app uses React Router v7 but is not in framework mode (it’s not a Remix-style app). It uses createBrowserRouter to manage routes. You can view the router configuration in the Github repo.
Implementing code-splitting at the route level
If you use a framework (Next or Remix), route-level code splitting is handled automatically. However, this is an easy win for many single-page applications built without a framework that can significantly improve performance.
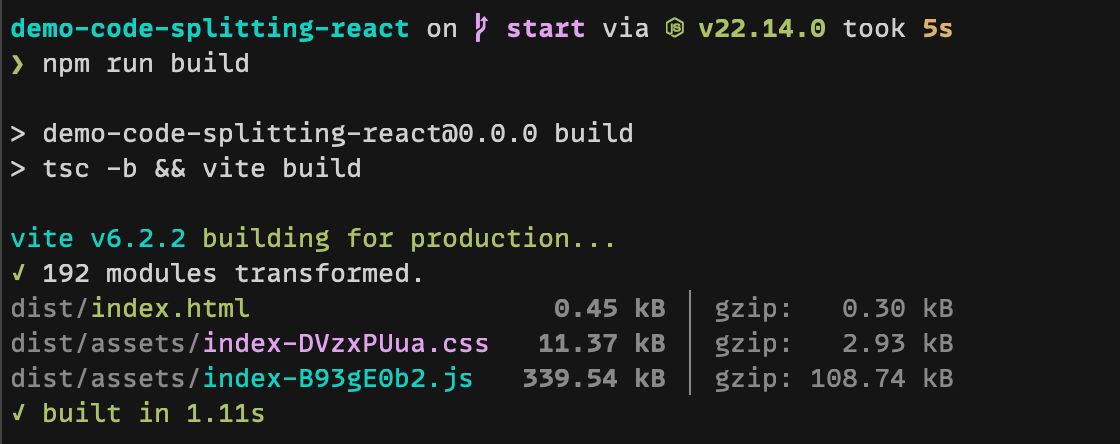
After running npm run build, you’ll notice that Vite currently generates one JS file (over 100KB). As you add more content to each page, this file will only get bigger. This means that users must download the entire app’s JavaScript code, even if they visit only a specific part of the app.

We can help Vite split our code at the route level. This ensures JavaScript for a specific page loads only when needed.
Step 1: Using React.lazy for route-level code splitting
In our router/index.tsx, instead of importing every page component directly, we can use React.lazy to import every page. We’ll skip lazy loading for the Home page, as it’s likely the most common entry point to the app.
React.lazy ensures a component is imported only when it gets rendered. This is the behavior we want for most of the routes.
Let’s wrap every page component with React.lazy:
// in src/router/index.tsx
import {createBrowserRouter} from 'react-router';
import Home from '../pages/Home';
import {AppLayout} from '../layouts/AppLayout';
import {lazy} from 'react';

// We wrap each page previously imported with React.lazy.
// React.lazy takes a function that returns a promise resolving to a React component.
const About = lazy(() => import('../pages/About'));
const NotFound = lazy(() => import('../pages/NotFound'));
const MovieDetails = lazy(() => import('../pages/MovieDetails'));
const Movies = lazy(() => import('../pages/Movies'));
Step 2: Adding Suspense for loading states
Next, we need to add a Suspense boundary to handle loading states while the code is being fetched. We could add one to the AppLayout to have a generic loader.
Let’s create a quick loader component:
// src/components/Loader/index.tsx
type LoaderProps = {
  message?: string;
};

export function Loader({message = 'Loading content...'}: LoaderProps) {
  return (
    <>
      <p>
        <span className="sr-only">{message}</span>
      </p>
      <div className="my-4 flex h-12 w-12 animate-spin justify-self-center rounded-full border-8 border-gray-300 border-t-teal-600" />
    </>
  );
}
Then, we can wrap the Outlet in the AppLayout with a Suspense component and use our new fancy loader as a fallback:
// components/AppLayout/index.tsx
import {Suspense} from 'react';
import {NavLink, Outlet} from 'react-router';
import {Loader} from '../../components/Loader';

export function AppLayout() {
  return (
    <>
      <header className="bg-teal-800 text-white">
        {/* rest of header content */}
      </header>
      <main>
        <div className="max-width-wrapper py-6">
          {/* let's wrap up our Outlet with a Suspense component */}
          <Suspense fallback={<Loader />}>
            <Outlet />
          </Suspense>
        </div>
      </main>
    </>
  );
}
Step 3: Testing our changes
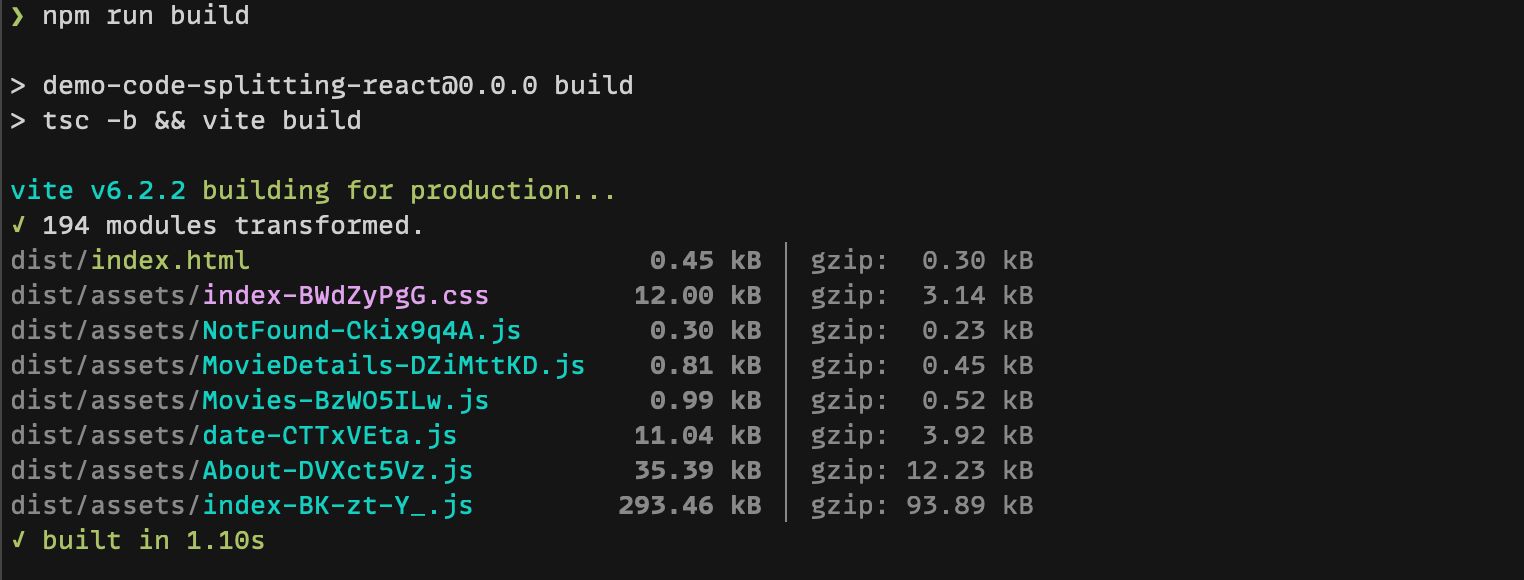
This simple change greatly improves our build output. After running npm run build, we see that Vite creates a JS file for each page. Additionally, there’s a JS file for the date utility used on the movies and movie detail pages. In larger projects, where pages may become complex and large, this approach ensures the build doesn’t generate one massive JavaScript file for the entire application.

If you'd like to see the completed code for the route-level code-splitting, you can check out the end-route-code-splitting branch:
git checkout end-route-code-splittingFixing the multiple loaders
Now that we’ve split our routes using React.lazy, we’ve reduced our initial JavaScript load. However, we now have a subtle UX issue: multiple loaders.
When users land on the Movies page, they first see the Loader from AppLayout. Then, after the component mounts, React Query starts fetching movie data, triggering another loading state. This creates a flickering effect where two loaders appear back-to-back.
To fix this, we have a few approaches.
Solution 1: use another Suspense boundary
We could wrap each movie and movie detail page with a Suspense boundary that uses fallback={null}, meaning no loading indicator will be displayed. However, this is not ideal since users will see an empty space while the route component loads.
// in router/index.tsx
export const router = createBrowserRouter([
  // ...
  {
    id: 'movies',
    path: '/movies',
    element: (
      <Suspense fallback={null}>
        <Movies />
      </Suspense>
    ),
  },
  // ...
]);
This might be a perfectly acceptable solution if:
- The component loads quickly.
- A brief blank state does not negatively impact the user experience.
Solution 2: leverage useSuspenseQuery from @tanstack-query
A more robust approach is to use useSuspenseQuery from react-query (it is no longer experimental since v5). Here are some key differences between useSuspenseQuery and useQuery:
- Simplified Loading State:
useSuspenseQueryeliminates the need to handle loading states manually, as it guarantees the data property will be defined once the query resolves. React will suspend the component until the data is available. This means you don’t need to handle the loading state manually, letting Suspense take care of it automatically. - Error Handling: Since
useSuspenseQueryno longer returns an error state, it's essential to use anErrorBoundaryto handle potential errors during the data fetching. Without it, unhandled errors would cause your UI to break
In our hooks/useMovies.ts, let’s add a new hook:
// hooks/useMovies.ts
import {useQuery, useSuspenseQuery} from '@tanstack/react-query';
import {fetchMovie, fetchMovies} from '../api/movies';

export const useMoviesWithSuspense = () => {
  return useSuspenseQuery({
    queryKey: ['movies'],
    queryFn: fetchMovies,
    select: (data) => {
      return data.results;
    },
  });
};
Then, in our Movies.tsx, we can replace the useMovies hook with useMoviesWithSuspense:
// pages/Movies.tsx
import {Link} from 'react-router'
import {useMoviesWithSuspense} from '../hooks/useMovies'
import {formatDate} from '../utils/date'

function Movies() {
	// let's use our new hook.
	// It no longer returns a `status`
  const {data: movies} = useMoviesWithSuspense()

  return (
    <>
      <h1 className="mb-4 text-xl">Our most popular movies</h1>
      <ul className="grid grid-cols-2 gap-x-5 gap-y-10">
        {movies.map((movie) => {
          return (
          //Nothing changes here
         )
        })}
      </ul>
    </>
  )
}

export default Movies
Let’s install react-error-boundary to handle errors and add a React boundary to our AppLayout.
npm install react-error-boundaryIn the AppLayout, we can add an ErrorBoundary around the Suspense boundary to catch any potential errors in the data-fetching process and prevent the entire app from crashing.
import {Suspense} from 'react';
import {NavLink, Outlet} from 'react-router';
import {Loader} from '../../components/Loader';
import {ErrorBoundary} from 'react-error-boundary';

export function AppLayout() {
  return (
    <>
      <header className="bg-teal-800 text-white">{/* some content */}</header>
      <main>
        <div className="max-width-wrapper py-6">
          <ErrorBoundary fallback={<p>⚠️Something went wrong</p>}>
            <Suspense fallback={<Loader />}>
              <Outlet />
            </Suspense>
          </ErrorBoundary>
        </div>
      </main>
    </>
  );
}
This acts as a catch-all ErrorBoundary. Alternatively, we could integrate an ErrorBoundary directly into the router configuration for a specific route. You can find more information about this approach in the React Router documentation.
Solution 3: Combining the power of loader functions from react-router with react-query
The third approach (and my personal favorite) combines React Router's loader functions (introduced in react-router v6.4) with React Query.
For our MovieDetails, we face a similar challenge as we did on the Movies page: we need to fetch movie data once the component renders. By combining react-query with react-router loaders, we fetch data during the routing process rather than after component mounting, while still leveraging react-query's caching capabilities.
Since we’re using react-router v7 and createBrowserRouter, loaders allow us to fetch data before the component mounts. The result is passed directly to the component, and we can continue using react-query for caching.
Setting up the loader function
First, let’s create a new file loader.ts in our MovieDetails folder (feel free to name it differently). This file will contain our loader function:
// src/pages/MovieDetails/loader.ts
import type {LoaderFunctionArgs} from 'react-router';
import type {QueryClient} from '@tanstack/react-query';
import {getMovieDetailsQuery} from '../../api/movies';
import type {Movie} from '../../types/movie';

export const movieDetailsLoader =
  (queryClient: QueryClient) =>
  async ({params}: LoaderFunctionArgs) => {
    const query = getMovieDetailsQuery(params.id ?? '');

    return queryClient.ensureQueryData(query) as Promise<Movie>;
  };
I created a getMovieDetailsQuery that returns the query options we were using in our useMovie hook:
// in src/api/movies.ts

export const getMovieDetailsQuery = (movieId: string) => {
  return {
    queryKey: ['movies', movieId],
    queryFn: () => fetchMovie(movieId),
    enabled: Boolean(movieId),
  };
};
Some key points about the loader function:
- QueryClient: The loader function receives a
queryClientthat we will pass from the router. Since loaders are not hooks, we cannot useuseQueryClientto access the react-query store directly. - getMovieDetailsQuery: This function returns the query options we usually use with
useQuery. - What
movieDetailsLoaderreturns: It returns a function with the loader signature. The returned function receives arguments like theparamsthat react-router automatically passes to all the loader functions. - ensureQueryData: The ensureQueryData method ensures that if the data isn't already cached, the query will be executed to fetch the data. Check out the react query document.
Moving the query client to its own file
Before we can use this loader, we need to make the queryClient available in our app. Let’s extract the queryClient into a separate file so we can import it wherever needed.
Let's create a src/queryClient/index.ts:
import {QueryClient} from '@tanstack/react-query';

export const queryClient = new QueryClient();
In main.tsx, let’s import and use it.
// src/main.tsx
// ...
import {queryClient} from './queryClient';

createRoot(document.getElementById('root')!).render(
  <StrictMode>
    <QueryClientProvider client={queryClient}>
      <RouterProvider router={router} />
    </QueryClientProvider>
  </StrictMode>
);
Modifying our router
Now, in router/index.tsx, we can import the loader function and the queryClient:
// router/index.tsx
// ... other imports
import {queryClient} from '../queryClient';
import {movieDetailsLoader} from '../pages/MovieDetails/loader';

export const router = createBrowserRouter([
  {
    id: 'root',
    element: <AppLayout />,
    children: [
      // ...
      {
        id: 'movieDetail',
        path: '/movies/:id',
        // we use the loader property and call the movieDetailsLoader which returns a
        // function with the correct signature.
        loader: movieDetailsLoader(queryClient),
        element: <MovieDetails />,
      },
      // ...
    ],
  },
]);
Accessing loaded data in the MovieDetails page
Finally, we can replace the useMovie hook in the MovieDetails component with the useLoaderData hook, which gives us access to the data returned by the loader function. The Typescript part comes from this fantastic article, which digs deeper into the technique we are currently implementing.
// in pages/MovieDetails/index.tsx
function MovieDetails() {
//We replace our useMovie with useLoaderData
// notice we no longer have any isLoading or isError 👀
const movie = useLoaderData() as Awaited<
ReturnType<ReturnType<typeof movieDetailsLoader>>
>;
return (
<div>
<Link to="/movies" className="mb-3 inline-block py-2 underline">
← Back to all movies
</Link>
<h1 className="text-3xl">{movie.title}</h1>
<p className="mt-3">by {movie.director}</p>
<p className="mt-3">Release date: {formatDate(movie.release_date)}</p>
<div className="my-4 border border-dotted border-amber-500 p-3">
<h2 className="mb-3 font-bold">Summary</h2>
<p>{movie.opening_crawl}</p>
</div>
</div>
);
}Benefits of all this work
We’ve written quite a bit of code for this third solution. Some key benefits of this approach are:
- We no longer have to manage any
isLoadingorisErrorbooleans in our MovieDetails page since the loader fetches the data before the component mounts. - We still benefit from React Query’s caching, to avoid unnecessary refetching.
Which approach to choose?
Each solution offers different trade-offs between simplicity, performance, and developer experience. There isn't a one-size-fits-all solution.
Solution 1 is straightforward but may lack robustness and lead to layout shifts. Solution 2 offers a more efficient approach by leveraging the route's closest Suspense boundary and ErrorBoundary, with minimal code changes. Solution 3, on the other hand, embraces newer capabilities from React Router, introducing a shift in how we load data on the client side.
By adopting Solution 2 or Solution 3, we eliminated the problem of multiple loaders on the Movie and MovieDetails pages! Additionally, our build output remains unchanged after these refactorings.
To see the implementations of these approaches, you can checkout the end-multiple-loaders branch:
git checkout end-multiple-loadersBeyond code splitting at the route level
While route-level code splitting provides significant benefits, it may not be sufficient for complex applications where individual pages contain numerous components or require large libraries. In such cases, code-splitting at the route level might not reduce load times, as you could end up with large JavaScript chunks that need to be downloaded. This section will explore how to apply more granular techniques for code-splitting to optimize loading performance.
Scenario: we have added a fancy animation that is quite heavy
I’ve created a new branch where I added a fancy loading animation.
git checkout starter-lazy-loading-componentThe animation is a Lottie animation, a JSON file you can use with the react-lottie library. If you’re curious, you can check out the animation on the About page by clicking on the button 🐰.
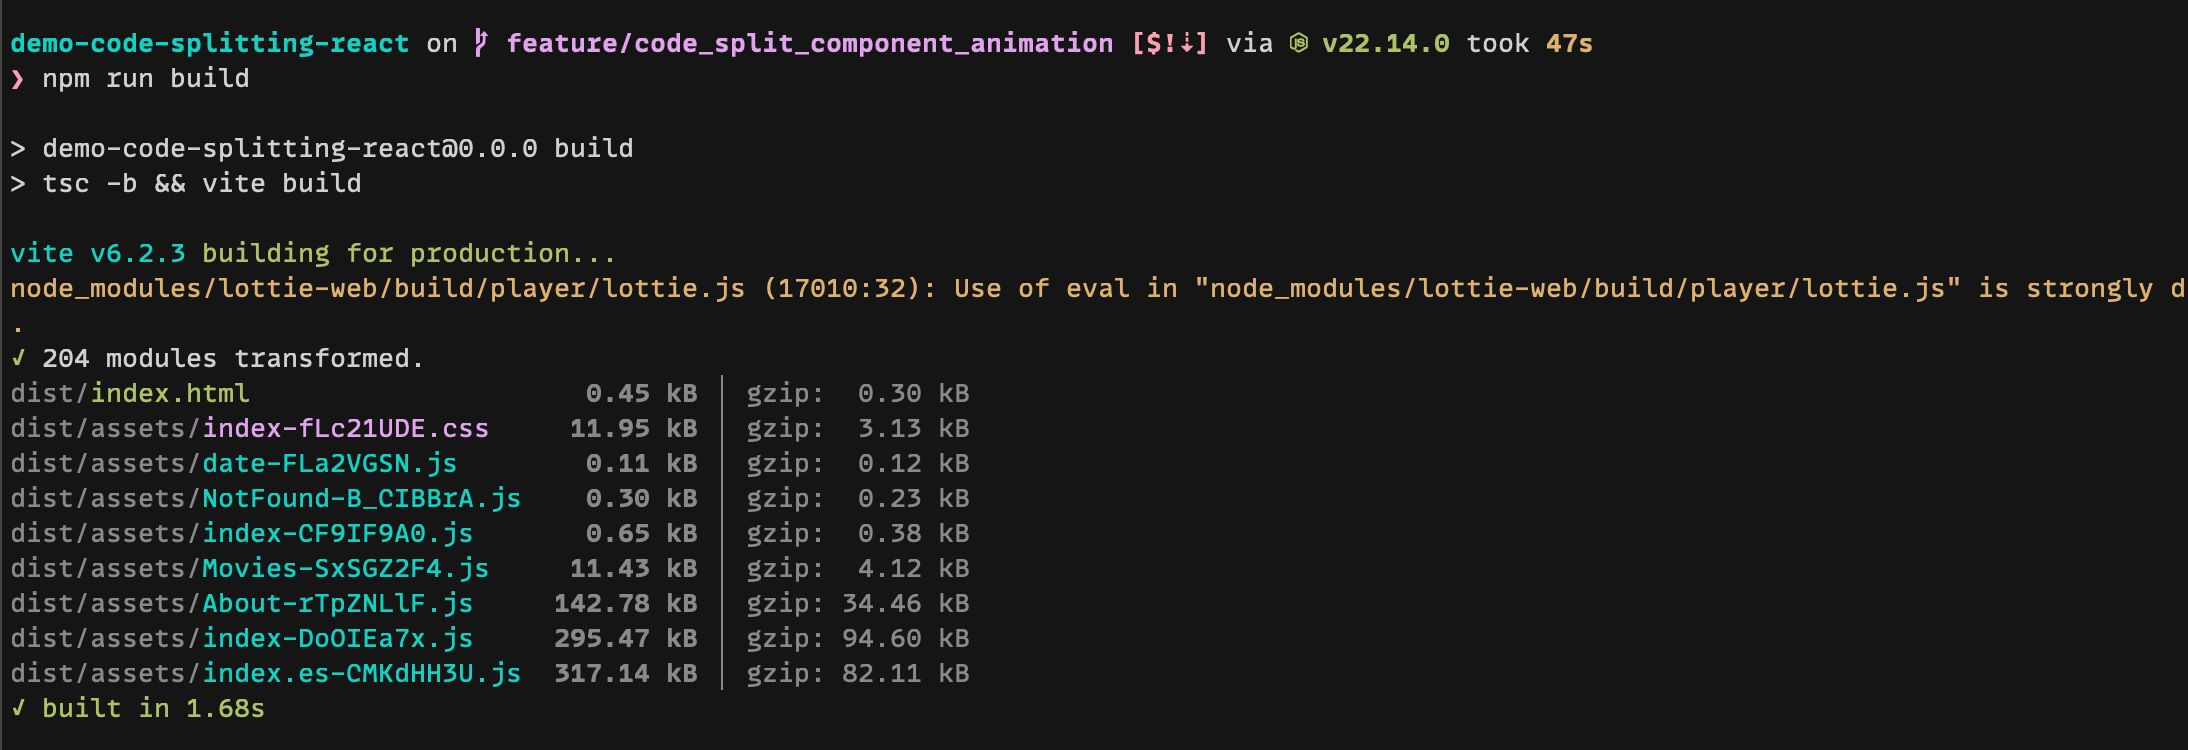
After running npm run build, we have a JS file for the About page of over 100KB. The file size is due mainly to the react-lottie library used to play the animation.

What problem are we trying to fix?
In our case, many users might not even interact with the modal that triggers the animation. This means the react-lottie library is unnecessarily included in the initial JavaScript bundle, even though it isn’t used immediately.
To optimize this, we can use code-splitting to ensure that the react-lottie library is loaded only when the user interacts with the modal. This way, we avoid loading unnecessary code upfront.
Lazy-loading the Animation component
First, let’s improve our FancyAnimation component. We can use React.lazy to dynamically import the react-lottie library, and we’ll also need to wrap this lazy-loaded component in a Suspense component. This ensures that the application handles any slight delay when loading the animation.
// components/FancyAnimation/index.tsx
import {usePrefersReducedMotion} from '../../hooks/usePrefersReducedMotion';
import {lazy, Suspense} from 'react';
import easterBunnyAnimation from './easter_bunny_anim.json';

// Replace the import LottiePlayer from 'lottie-react' with this dynamic import
const LottiePlayer = lazy(() => import('lottie-react'));

export const FancyAnimation = () => {
  const prefersReducedMotion = usePrefersReducedMotion();

  return (
    <div className="min-h-[450px]">
      {/* wrap the LottiePlayer component with Suspense */}
      <Suspense fallback={null}>
        <LottiePlayer
          animationData={easterBunnyAnimation}
          loop={false}
          autoplay={!prefersReducedMotion}
        />
      </Suspense>
    </div>
  );
};
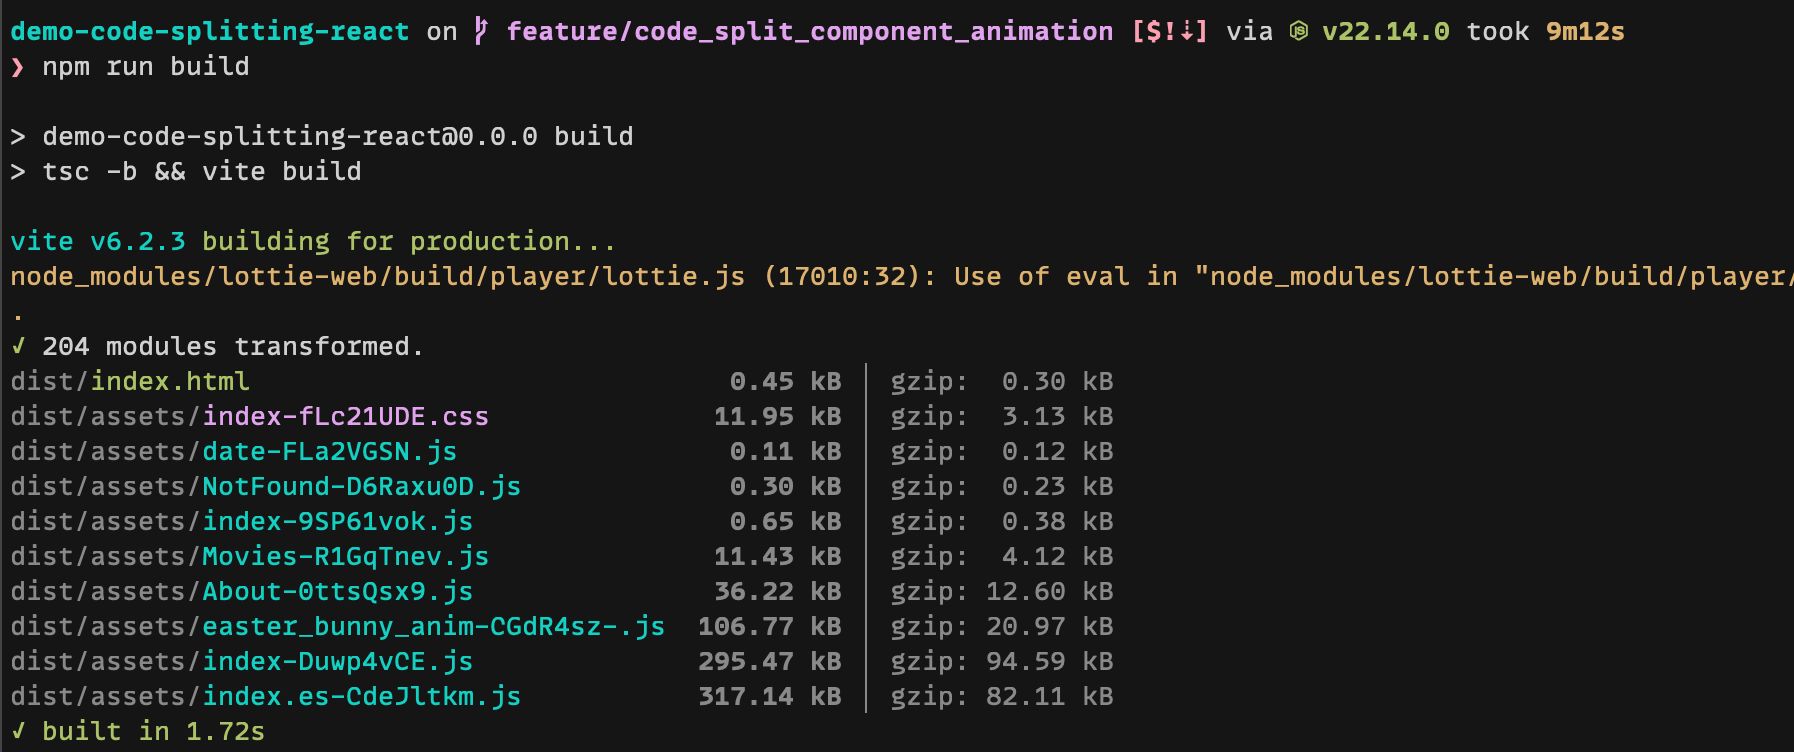
If we look at our build output, Vite now creates a separate chunk that contains the code related to react-lottie and a chunk for the About page of about 30KB.

Further optimization: lazy-loading the animation JSON
While we’ve reduced the chunk size of our About page, most of the 30KB is still due to the animation JSON itself. To optimize further, we can load the animation JSON only when the component is rendered rather than include it in the initial load.
Since we’re using React 19, we can take advantage of the new use hook, which allows us to read the value of a promise (like our JSON animation) and suspend the component while the promise is resolving. By combining the use hook with Suspense, we can lazily load both the react-lottie library and the animation JSON.
Using React’s use hook to load the animation JSON
Let’s refactor the component to dynamically import the animation JSON and use the use hook to handle the promise resolution. This change will further reduce the initial load size.
First, let’s create the promise for the animation outside of the component:
// in components/FancyAnimation/index.tsx

// After the imports, create the promise to import the animation JSON dynamically.
const animationPromise = import('./easter_bunny_anim.json').then(
  (data) => data.default
);
Then, we can create an inner component that our Suspense boundary can wrap. If we don’t, when the animation gets loaded, it will suspend to a Suspense boundary higher up the component tree, as the entire FancyAnimation would suspend.
Let’s use the use hook and pass it the animation JSON promise we’ve just created.
import {usePrefersReducedMotion} from '../../hooks/usePrefersReducedMotion';
import {lazy, Suspense, use} from 'react';

const LottiePlayer = lazy(() => import('lottie-react'));
const animationPromise = import('./easter_bunny_anim.json').then(
  (data) => data.default
);

// Create an inner component that contains the LottiePlayer and the animation JSON
const AnimationContent = () => {
  const prefersReducedMotion = usePrefersReducedMotion();
  const animationData = use(animationPromise);

  return (
    <LottiePlayer
      animationData={animationData}
      loop={false}
      autoplay={!prefersReducedMotion}
    />
  );
};

export const FancyAnimation = () => {
  return (
    <div className="min-h-[450px]">
      <Suspense fallback={null}>
        <AnimationContent />
      </Suspense>
    </div>
  );
};
Final build output
With this refactoring, our build output is back to a tiny JS file size of around 12 KB for the About page. Users not interacting with the modal won't have to load that JavaScript.

You can see the final implementation by checking out the end-lazy-loading-component branch:
git checkout end-lazy-loading-componentConclusion
In this blog post, we explored some techniques around code-splitting in a React single-page application. We looked at code-splitting at the route level and at a couple of techniques to mitigate the dreaded multiple loaders effect. We had some practice with Suspense and the new use hook. We then experimented with optimizing our bundle when we use a heavy component on a page. I hope you found this post helpful! Feel free to reach out on Bluesky if you have any questions or would like to share your own experiences with this topic!